Ultimate Guide to Timber Floor Sanding For Auckland Homes
Introduction: Why Floor Sanding Matters For Auckland Homes
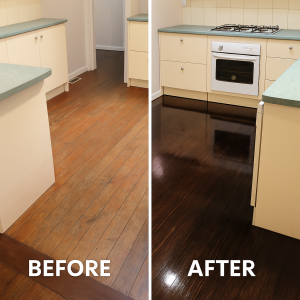
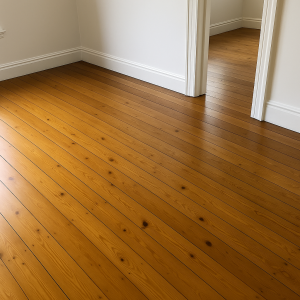
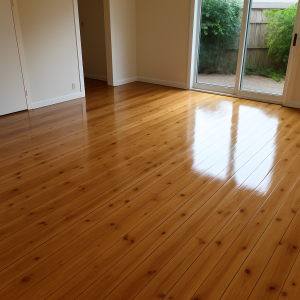
Timber flooring is one of the most enduring and sought-after features in Auckland homes. From polished kauri boards in Devonport villas to matai floors in Mount Roskill state houses and engineered oak planks in Albany new builds, wood flooring reflects the city’s mix of heritage and modern design. Over the years, however, even the hardest timber surfaces begin to show signs of age.
Daily life leaves its mark — dragging chairs across the lounge, pets running across hallways, or high heels leaving dents at the front door. Add to this Auckland’s climate, with its mix of coastal humidity and seasonal temperature swings, and timber surfaces often dull faster than expected. Coatings wear down, scratches deepen, and once-glossy floors begin to absorb moisture and dirt.
That’s where floor sanding becomes essential. For Auckland homeowners, sanding is not just about making floors look new again. It:
Restores appearance – bringing back the natural grain and character of kauri, rimu, matai, or oak.
Extends floor life – by removing damaged layers and preparing for strong protective coatings.
Improves hygiene – as scratches and worn coatings trap dust, pollen, and dirt that affect indoor air quality.
Adds property value – polished timber floors are a selling point in real estate listings across suburbs like Remuera, Epsom, and Takapuna.
Supports renovations – especially when blending old and new spaces in villa upgrades or modern extensions.
Whether you’re preparing a Grey Lynn villa for sale, renovating a family home in Howick, or upgrading an investment property in Henderson, floor sanding is one of the most cost-effective ways to refresh timber surfaces and make them last.
How Floor Sanding Works
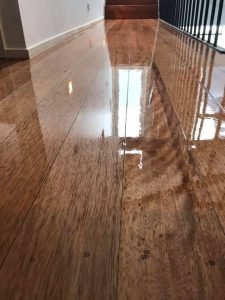
At its core, sanding removes the top layers of wood to expose fresh, smooth timber beneath. This provides a clean foundation for new finishes such as polyurethane, oils, or stains. The process is precise, with each stage designed to gradually refine the surface.
What Sanding Removes
Old coatings – Polyurethane or oils eventually crack, peel, or lose sheen. Sanding strips these away completely.
Scratches and dents – Caused by furniture, pets, or general wear, they disappear once the damaged surface layer is sanded off.
Water stains and sun fading – Auckland’s damp winters and bright summers both affect timber colour. Sanding restores even tone.
Minor cupping or unevenness – Where boards warp slightly from moisture, sanding can level the surface.
The Sanding Stages
Initial site preparation
Furniture is cleared, nails are punched down, and damaged boards are noted for repair.
In older villas, extra care is taken to identify squeaky or loose boards before sanding begins.
Coarse sanding
Heavy grit (often 24–36 grit) is used to strip coatings and flatten boards.
This stage reveals the raw timber and sets the base for finer sanding.
Medium sanding
Progressively finer grits (40–80) smooth out the scratches from the first pass.
At this stage, the floor begins to look even and clean.
Fine sanding
Very fine grit (100–120) polishes the surface, leaving it ready for finishing.
This stage ensures stains or clear coats apply evenly.
Edges and corners
Special edging machines sand along skirting boards, under radiators, and into corners.
Hand sanding or small tools finish tight spots such as staircases or around fireplaces.
Dust Control in Auckland Homes
One of the biggest homeowner concerns is dust. In the past, sanding often meant days of cleaning up afterwards. Today, professional Auckland contractors use dust-free sanding machines with built-in vacuum systems. These collect up to 95% of dust as it’s created.
Benefits for homeowners:
Cleaner homes, especially important for apartments and townhouses in central Auckland.
Safer for families with allergies or asthma, reducing airborne irritants.
Protects painted walls, curtains, and furniture from fine dust particles.
Pro Tip for Aucklanders: When getting quotes, ask if the contractor uses dust-free equipment. This service is particularly useful in villas and bungalows where airflow is limited during winter.

Practical Tips Before Sanding Begins
Plan for access – You won’t be able to walk on floors while sanding and coating is underway. For a three-bedroom villa, plan 3–5 days of limited access.
Check ventilation – Auckland’s coastal air helps with drying, but ensure windows can open for safe curing.
Consider pets and kids – Arrange temporary areas where they can stay clear of the work zone.
Discuss finishes early – Decide on polyurethane, oil, or stain colours before sanding begins. This avoids delays once the floor is ready for coating.
Common Auckland Timber Types and What That Means for Sanding
Auckland’s housing mix reflects different eras of building, from 19th-century kauri villas to mid-20th-century state houses and new suburban developments. Each era introduced specific timber flooring, and knowing the type of timber underfoot is vital when planning sanding and polishing.
Kauri
Kauri is iconic in Auckland villas, particularly in suburbs like Ponsonby, Grey Lynn, and Devonport. These golden-hued boards are highly valued but often 80–120 years old.
Sanding notes: Kauri is relatively soft, so sanding must be done carefully to avoid gouges. Heavy sanding can remove too much surface, reducing board life.
Typical issues: Nail heads rising in old floors, gaps between boards, and previous patch repairs.
Finishes that work best: Water-based polyurethane to preserve natural colour, or light oil finishes for warmth.
Matai
Matai floors are common in 1940s–1960s state houses in areas such as Mount Roskill, Glen Innes, and Henderson. They are harder than kauri and feature a warm, reddish-brown grain.
Sanding notes: Matai sands well but can produce resin spots that need sealing.
Typical issues: Dark staining from water near kitchens and laundry rooms.
Finishes that work best: Satin polyurethane highlights its grain without making it too glossy.
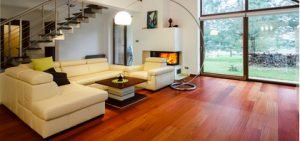
Rimu
Rimu was popular in mid-century Auckland homes and remains one of the most widespread timbers. Its colour ranges from golden brown to darker red tones.
Sanding notes: Rimu can have inconsistent density, so some patches sand quicker than others. Care is needed to achieve even results.
Typical issues: Sun fading in lounges with large north-facing windows.
Finishes that work best: Oil-based polyurethane to deepen natural colour, or water-based for a modern matte look.
Tawa
Tawa is a pale, creamy native hardwood found in many 1960s–1980s builds across Auckland suburbs like Glenfield and Pakuranga.
Sanding notes: Tawa’s lighter colour shows scratches easily, so fine sanding and multiple coats are essential.
Typical issues: Dents and scratches from heavy furniture are common due to its medium hardness.
Finishes that work best: Staining is often chosen to darken tawa, giving it a more contemporary look.
Parquet
Parquet block flooring, often rimu, tawa, or oak, was a design feature in mid-century and some upmarket 1980s homes in Epsom and Remuera.
Sanding notes: Requires specialist sanding as blocks are laid in multiple directions. Machines must follow the grain carefully to avoid tearing.
Typical issues: Loose or lifting blocks, gaps, and unevenness in older installations.
Finishes that work best: Satin or matte polyurethane for a classic look, or light stain for a modern twist.
Heritage Villa Floors in Auckland
Heritage homes in suburbs such as Mount Eden, Kingsland, and Parnell often feature original timber floors that have survived decades of wear. Restoring these requires extra steps:
Punching nails – Old floors have nails close to the surface; these must be hammered down to protect sanding belts.
Gap filling – Wide gaps between boards can be filled with flexible fillers or timber slivers.
Repairs – Rot-damaged boards (especially near kitchens or bathrooms) often need replacing with reclaimed kauri or matai to match the original.
Table: Auckland Timber Floors at a Glance
| Timber Type | Common Suburbs | Hardness | Sanding Challenges | Best Finish Options |
|---|---|---|---|---|
| Kauri | Ponsonby, Grey Lynn, Devonport | Soft | Prone to gouging, nail heads | Water-based poly, light oils |
| Matai | Mt Roskill, Glen Innes, Henderson | Hard | Resin spots, water stains | Satin polyurethane |
| Rimu | Widespread mid-century homes | Medium | Uneven sanding in patches | Oil-based or water-based poly |
| Tawa | Glenfield, Pakuranga, West Auckland | Medium-hard | Shows scratches easily | Stain + polyurethane |
| Parquet | Epsom, Remuera, some 1980s builds | Varies | Sanding multi-grain patterns | Satin/matte polyurethane |
Local Insight
Many Auckland homeowners don’t know exactly what timber they have until sanding begins. Contractors often identify species once old coatings are removed. If you’re planning renovations, ask your floor sander to confirm timber type during the first site visit. This ensures the right sanding approach and finish selection.
Finish Options for Auckland Conditions
Once sanding is complete, the bare timber surface must be sealed and protected. Choosing the right finish is one of the most important steps for Auckland homeowners. It not only defines how the floor looks but also how it performs in the city’s humid, coastal climate.
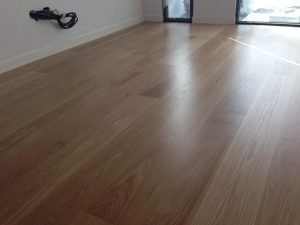
Water-Based Polyurethane
Water-based polyurethane is the most popular choice in modern Auckland homes. It provides a clear, natural look that doesn’t darken timber significantly, making it ideal for lighter woods like kauri or tawa.
Advantages:
Fast curing – Walkable in 24 hours, with full cure in 5–7 days, ideal for busy Auckland families.
Low odour – Safer for households staying in the property during sanding.
Non-yellowing – Retains natural colour, especially important in sunlit Auckland lounges.
Low VOCs – Eco-friendlier option, aligning with Aucklanders’ preference for healthier homes.
Considerations:
More expensive than oil-based finishes.
May require more coats (often three) for durability.
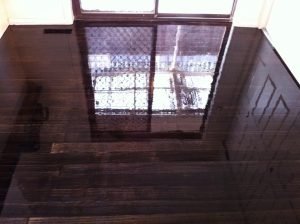
Oil-Based Polyurethane
Oil-based polyurethane has been used in Auckland homes for decades. It provides a warm, amber tone that enhances the richness of matai, rimu, or darker timbers.
Advantages:
Durable – Withstands heavy foot traffic, good for large families.
Cost-effective – Generally cheaper than water-based.
Colour depth – Enhances red and golden tones in native timbers.
Considerations:
Strong smell – Requires ventilation during application and curing.
Slower curing – Furniture may need to stay off floors for 10–14 days.
Yellowing – Floors will darken over time, which some homeowners like but others don’t.
Hardwax Oil Finishes
Hardwax oils are increasingly popular in Auckland, especially in renovations where a natural, matte appearance is desired. They soak into the timber rather than forming a hard film on top.
Advantages:
Natural look – Retains the texture and grain of timber.
Easy spot repairs – Damaged areas can be lightly sanded and re-oiled without refinishing the entire floor.
Breathable – Works well with older villa floors that need flexibility.
Considerations:
More maintenance – Needs re-application every 2–3 years.
Less protective – Prone to water marks in kitchens or dining areas.
Staining Timber Floors
Staining is a common request in Auckland as homeowners look to modernise older floors or create a cohesive look in renovated spaces.
Popular stain choices in Auckland:
Light natural – Keeps kauri bright in villas.
Warm honey – Works well on matai and rimu.
Walnut or dark chocolate – Modern look for apartments or villas with contemporary décor.
Grey washes – Popular in coastal suburbs like Takapuna or Mission Bay.
Staining considerations:
Stains highlight imperfections — floors must be sanded evenly.
Always test patches first, as timbers absorb stain differently.
Best combined with water-based polyurethane to lock in colour.
Choosing the Right Finish for Auckland Homes
When deciding on a finish, consider:
Climate: High humidity slows curing; water-based finishes cope better in winter months.
Lifestyle: Families with children and pets benefit from harder finishes like polyurethane.
Look: Water-based for a modern matte look, oil-based for warm classic tones, or stain for customised colours.
Budget: Oil-based is cheaper upfront, but water-based and hardwax oils may provide better long-term value.
Table: Comparing Finish Options
| Finish Type | Appearance | Curing Time | Durability | Best For |
|---|---|---|---|---|
| Water-Based Polyurethane | Clear, natural look | 5–7 days | High | Modern homes, light timbers, families with allergies |
| Oil-Based Polyurethane | Amber, warm tone | 10–14 days | Very high | Traditional villas, matai/rimu floors, budget-friendly |
| Hardwax Oil | Matte, natural feel | 2–3 days walk-on | Medium | Heritage homes, easy repairs, natural finishes |
| Staining + Poly | Custom colours | Same as topcoat | High | Modernising older floors, coastal style, design-focused projects |
Auckland Climate Factors: Humidity, Ventilation, and Curing
Auckland’s coastal climate is one of the most important considerations when sanding and finishing timber floors. With warm, humid summers and damp winters, the city’s conditions directly affect how timber behaves and how finishes cure. Understanding these factors helps homeowners plan sanding projects with realistic expectations.
Humidity and Timber Movement
Timber is a natural material that absorbs and releases moisture depending on the air around it. In Auckland, where relative humidity can often exceed 80% in winter, this causes timber to expand slightly. During dry summer months, boards contract, sometimes leaving small gaps.
Impact on floor sanding:
If sanding is done in high humidity, boards may be swollen. Once summer dryness arrives, gaps can appear between them.
In very dry periods, sanding may expose more gaps than usual, which need filler or slivers.
Tip for homeowners: Sanding can be done year-round, but contractors often recommend late spring or early autumn when conditions are balanced.
Ventilation During Sanding and Coating
Good airflow is essential for both safety and finish quality. In older Auckland villas, windows and doors usually provide sufficient ventilation. In modern airtight homes, contractors may use fans or open multiple entry points to encourage air movement.
Why ventilation matters:
For water-based polyurethane: Ensures faster evaporation and curing, avoiding streaks.
For oil-based polyurethane: Prevents strong odours from lingering indoors and supports even drying.
For hardwax oils: Helps natural oils penetrate timber and set without tackiness.
Tip for apartments and townhouses: In central Auckland buildings with limited airflow, water-based finishes are often the best choice due to low odour and faster curing.
Curing Times in Auckland Conditions
Curing refers to the time it takes for finishes to fully harden. Auckland’s mix of high humidity and cooler nights often extends this process, even if surfaces feel dry to the touch.
Typical curing timelines in Auckland:
Water-based polyurethane: Walkable after 24 hours, furniture after 3–4 days, full cure in 7 days.
Oil-based polyurethane: Walkable after 48 hours, furniture after 7–10 days, full cure in 14 days.
Hardwax oils: Light use after 24 hours, furniture after 3 days, full cure in 7–10 days.
Practical advice:
Avoid placing rugs on newly finished floors for at least two weeks, as they trap moisture.
Place felt pads on furniture legs before moving items back.
Keep pets’ claws trimmed to avoid marking softer timbers during the early cure stage.
Seasonal Considerations in Auckland
Summer (Dec–Feb): Faster drying, but risk of heat and sun exposure causing uneven curing near windows.
Autumn (Mar–May): Ideal balance of temperature and humidity — often the best season for sanding.
Winter (Jun–Aug): Slower curing due to damp air; extra ventilation and dehumidifiers may be required.
Spring (Sep–Nov): Good for sanding, but pollen can enter through open windows, so surfaces must be kept clean before coating.
Homeowner Checklist: Preparing for Climate Factors
Check forecast: Aim for dry days with moderate temperatures.
Allow airflow: Open multiple windows or doors for ventilation.
Delay rug placement: Wait at least two weeks after coating.
Use dehumidifiers in winter: Helps reduce curing times indoors.
Be patient: Even if floors look dry, they need time to fully harden.

The Step-by-Step Process We Follow
Every Auckland home is different — from tight villa hallways in Ponsonby to large open-plan living areas in Howick. Yet, the process of sanding and refinishing timber floors follows a consistent sequence. Below is a breakdown of the typical workflow used by professional floor sanding teams across Auckland.
1. Site Check and Initial Assessment
Moisture readings: Floors are tested with a moisture meter to ensure they are within a safe range for sanding (usually below 18%). High moisture content can cause finish failure later.
Inspection of timber type: Identifying whether the floor is kauri, matai, rimu, tawa, or engineered oak determines sanding settings.
Damage review: Loose or rotten boards are flagged, especially common in older villas with bathroom or laundry leaks.
Local insight: In Auckland’s coastal suburbs (e.g., Takapuna, Mission Bay), salt and moisture exposure often make edge boards more vulnerable to damage.
2. Preparation and Repairs
Furniture removal: All furniture, rugs, and appliances are taken out. Heavy appliances such as fridges are moved carefully to avoid floor dents.
Nail punching: Raised nails are hammered down below the timber surface. This protects sanding machines and ensures a smooth result.
Board replacement: Damaged or missing boards are swapped out with reclaimed or new timber that matches the existing species.
Gap filling: Fine timber dust from sanding is mixed with resin to fill gaps, especially in heritage villas with wider boards.
3. Sanding Sequence
Coarse sanding: Using a drum or belt sander with 24–36 grit, the old finish and deep scratches are removed.
Medium sanding: Progressing to 40–80 grit, the floor surface is smoothed and evened out.
Fine sanding: Using 100–120 grit, the timber surface is prepared for coating.
Edges and corners: Specialized edgers and hand tools reach along skirting boards, around fireplaces, and into corners where larger machines cannot fit.
Pro tip: Parquet floors in Remuera or Epsom require diagonal sanding passes to respect the changing grain patterns.
4. Vacuuming and Surface Prep
After sanding, floors are thoroughly vacuumed to remove fine dust.
Contractors often wipe floors with a tack cloth to ensure no particles interfere with the finish.
At this stage, the raw beauty of the timber is fully visible. Homeowners often decide on stain colours after seeing the bare floor.
5. First Coat Application
The first coat (usually polyurethane, oil, or stain) seals the timber.
It penetrates the grain and highlights natural colour.
For stained floors, colour is applied evenly before the first clear coat.
6. De-nibbing and Additional Coats
After the first coat dries, the floor is lightly sanded (a process known as de-nibbing) to remove raised grain and achieve a smooth texture.
Additional coats (usually two to three) are applied, with light sanding between each.
Each coat adds durability and enhances the final appearance.
Timeline: In most Auckland homes, three coats are applied across 2–3 days, depending on drying conditions.
7. Final Inspection and Handover
Once the final coat cures, contractors check for evenness, sheen, and adhesion.
Small touch-ups are made where necessary.
Homeowners receive advice on when to move furniture back, how to care for floors, and recommended cleaning products.
Example Timeline: 100m² Auckland Home
| Task | Time Required | Notes |
|---|---|---|
| Site check & repairs | Half day | Includes moisture reading and nail punching |
| Coarse sanding | 4–6 hours | Depends on timber type |
| Medium & fine sanding | 4–6 hours | Plus edging and corners |
| First coat | 3–4 hours | Dry overnight |
| De-nibbing + 2nd coat | 1 day | Walkable after drying |
| 3rd coat + inspection | 1 day | Furniture after 3–7 days |
What Homeowners Should Expect
Noise: Sanding machines are loud — neighbours in terraced homes or apartments should be notified.
Access: Walking on floors is limited during sanding and coating. Plan alternative living arrangements if needed.
Smell: Oil-based finishes produce strong odours, while water-based have mild scents. Ventilation is essential.
Expected Timelines and Access
One of the most common questions Auckland homeowners ask before floor sanding begins is: “How long will I be off my floors?” The answer depends on the size of the area, the condition of the timber, and the type of finish chosen. While every project is unique, there are general timelines that apply to most homes.
Sanding Duration
Small spaces (20–40 m², e.g., a single lounge or dining area): 1–2 days
Medium homes (60–100 m², e.g., 3-bedroom villa): 2–3 days
Large areas (120–200 m², e.g., open-plan homes in East Auckland): 3–5 days
These estimates include preparation, sanding, and applying multiple coats of finish. Additional time may be required if repairs, gap filling, or staining are needed.
Walk-On Times
After the final coat is applied, floors need curing time. While surfaces may feel dry, they are not fully hardened. Walking too soon can damage coatings.
Typical walk-on times in Auckland conditions:
Water-based polyurethane: Walkable in socks after 24 hours.
Oil-based polyurethane: Walkable after 48 hours.
Hardwax oils: Walkable after 24 hours, but avoid heavy use for 3 days.
Moving Furniture Back
Furniture places weight and pressure on floors, so it must be delayed until finishes cure properly.
Water-based polyurethane: Light furniture after 3–4 days, rugs after 14 days.
Oil-based polyurethane: Furniture after 7–10 days, rugs after 14–21 days.
Hardwax oils: Furniture after 3–4 days, rugs after 10–14 days.
Tip for homeowners: Always lift furniture rather than dragging it. Attach felt pads to chair and table legs before placing them back.
Table: Timeline and Access Guide for Auckland Homes
| Stage | Water-Based Poly | Oil-Based Poly | Hardwax Oil |
|---|---|---|---|
| Walk on in socks | 24 hrs | 48 hrs | 24 hrs |
| Replace furniture | 3–4 days | 7–10 days | 3–4 days |
| Place rugs | 14 days | 14–21 days | 10–14 days |
| Full cure | 7 days | 14 days | 7–10 days |
Local Factors That Affect Timing
Auckland humidity: Slows drying, especially in winter. A job that normally takes 5 days in summer may extend to 7–8 days in July.
Ventilation: Apartments in the CBD with poor airflow may need longer curing times than villas with wide-opening windows.
Repairs: Replacing boards or filling wide gaps adds 1–2 extra days.
Staining: Adds at least one extra day, as stain must dry before clear coats are applied.
Planning Ahead as a Homeowner
Alternative living arrangements: Many families stay with relatives or book short-term accommodation for 3–5 days while floors are completed.
Kitchen and laundry access: Plan meals ahead if these areas are being sanded, as appliances will be temporarily unusable.
Pets and children: Arrange for them to be away from the home during sanding and curing to avoid disruptions.
Pricing Factors in Auckland
Floor sanding is an investment in both appearance and longevity of timber floors. While Auckland homeowners often ask for an exact price per square metre, costs vary widely depending on the home’s size, condition, and chosen finish. Below are the main factors that influence pricing in the Auckland market.
1. Size of the Area
The larger the area, the more time, materials, and labour are required. However, bigger jobs often benefit from a lower per-square-metre rate because setup costs are spread across more space.
Small rooms (under 20 m²): Higher per-m² cost due to setup time.
Medium homes (60–100 m²): Most common size for Auckland villas and family homes.
Large open-plan homes (120+ m²): Lower average rate, but total cost is higher due to scale.
2. Timber Condition
Light wear: Floors with surface scratches only require minimal sanding.
Heavy wear: Deep dents, water stains, or cupping increase sanding time.
Previous coatings: Floors with thick, old polyurethane or paint take longer to strip.
Local note: Many Auckland villas have had layers of varnish or paint applied over decades, adding to preparation time.
3. Type of Timber
Kauri: Soft, requires careful sanding to avoid damage.
Matai & Rimu: Harder timbers, take longer to sand.
Tawa: Lighter, scratches easily, so extra finishing care is needed.
Parquet: Requires more labour due to multi-directional sanding.
4. Stairs and Parquetry
Stairs: Each tread is sanded by hand or with small machines, making them labour-intensive.
Parquet floors: More costly due to the precision needed to sand across varied grain patterns.
5. Finish Type
Water-based polyurethane: Higher upfront cost, but preferred in many Auckland homes for durability and low odour.
Oil-based polyurethane: Less expensive but requires longer curing times.
Hardwax oil: Mid-range pricing but requires reapplication every 2–3 years.
Staining: Adds extra cost due to an additional process before sealing.
6. Repairs and Extras
Board replacement: Costs vary depending on timber availability. Reclaimed kauri or matai is more expensive than new pine or oak.
Gap filling: Labour-intensive, especially in heritage villas with wide floorboards.
Subfloor levelling: Occasionally needed in older homes with sagging boards.
7. Access and Location
Inner-city villas: Limited parking or steep driveways add time for equipment transport.
Apartments: Require moving sanding equipment through lifts and hallways.
Suburbs with easy access: Quicker setup, reducing labour costs.
Key Takeaway for Auckland Homeowners
The best way to get an accurate price is through an in-home assessment. Contractors will measure the area, test moisture levels, check timber type, and discuss finish preferences. Most reputable Auckland floor sanders provide free quotes with a clear breakdown of services.

Repairs and Upgrades Often Done Together
Floor sanding in Auckland rarely happens in isolation. Many homeowners choose to combine sanding with repairs or small upgrades to make the most of the process. This ensures the timber is not only smooth and polished but also structurally sound and ready for years of use.
Board Replacement
Over time, certain boards can become damaged beyond repair. This is common in kitchens, bathrooms, or entryways where moisture and heavy foot traffic are constant.
Villa floors in Ponsonby or Devonport: Kauri boards near bathrooms often show rot from past leaks.
Mid-century homes in Mt Roskill or Glenfield: Matai floors sometimes have broken edges from years of furniture scraping.
Solution: Damaged boards are removed and replaced with matching timber. In heritage homes, reclaimed kauri or matai is sourced to maintain authenticity.
Gap Filling
Many older Auckland homes, particularly villas and bungalows, develop wide gaps between boards due to timber movement over decades.
Traditional method: Sawdust mixed with resin creates a paste that fills small to medium gaps.
Sliver method: Thin strips of timber are glued into wider gaps for a permanent fix.
Benefit: Improves insulation, reduces draughts, and enhances the final polished look.
Subfloor and Levelling Work
In some homes, especially older villas, uneven subfloors cause boards to dip or rise.
Solution: Contractors may plane or pack boards to level them before sanding.
Benefit: Provides a smoother surface for sanding and prevents future squeaks or bounce.
Stair Sanding and Polishing
Stairs are often overlooked until a full sanding project begins. Since stairs see some of the heaviest foot traffic in a home, sanding and coating them ensures durability and consistency across the property.
Labour intensive: Each tread and riser is sanded with hand tools and finished with multiple coats.
Result: A uniform look that connects upstairs and downstairs spaces seamlessly.
Colour Matching Between Old and New Floors
With many Auckland homes undergoing renovations, new timber extensions are often joined with existing timber floors.
Process: Sanding blends the old and new surfaces, and staining or custom colour mixing ensures a consistent look.
Example: A Mt Eden villa extended into the backyard with new oak flooring matched to original kauri boards using stain and water-based polyurethane.
Edge Repairs and Trim Replacement
Sometimes skirting boards and trims need replacement during sanding. This is particularly true in older villas where trims were damaged during past renovations.
Solution: Fresh trims installed before final coats are applied.
Benefit: Creates a sharp, clean finish around the room edges.
Benefits of Combining Repairs with Sanding
Saves time and cost by addressing multiple issues in one project.
Prevents small problems (loose boards, gaps) from becoming major repairs later.
Improves both the look and performance of timber floors.
Ensures a longer-lasting finish by eliminating weak points.
Local Example Case Studies
Devonport villa (90 m² kauri): Replaced six rotten boards near kitchen, filled gaps, then sanded and polished. Outcome: seamless finish, no draughts, classic satin sheen.
West Auckland bungalow (100 m² rimu): Subfloor repaired and boards levelled before sanding. Result: floor felt solid underfoot, reduced squeaks, and polished to a warm oil-based finish.
Remuera townhouse (60 m² parquet): Several loose parquet blocks reset before sanding and satin polyurethane applied. Result: restored luxury feel without mismatched tones.
Case Snapshots from Auckland Homes
Every Auckland floor has its own story. From century-old kauri boards in villas to parquet blocks in mid-century lounges, sanding projects reveal the history of a home while preparing it for the future. Below are three case snapshots that reflect common local scenarios.
Case 1: Devonport Villa – Restoring Kauri to Its Former Glory
Home type: 1910s weatherboard villa

Timber: Kauri floorboards, approx. 90 m²
Condition before sanding: Multiple layers of old varnish, wide gaps between boards, and water damage near the kitchen.
Work completed:
Rotten boards replaced with reclaimed kauri.
Gaps filled using timber slivers for long-term stability.
Sanding completed with dust-free machines to minimise disruption.
Three coats of water-based polyurethane applied to preserve natural golden tones.
Result: Floors regained their classic warm appearance, with a matte sheen that matched the villa’s heritage style. Draughts were reduced, and the home’s value increased prior to resale.
Case 2: Glenfield Bungalow – Matai Floors for a Busy Family
Home type: 1960s single-level bungalow
Timber: Matai, approx. 95 m²
Condition before sanding: Deep scratches from furniture, resin spots, and worn patches in high-traffic areas like the hallway.
Work completed:
Nail punching and board repairs.
Coarse-to-fine sanding sequence, with attention to resin-heavy sections.
Satin oil-based polyurethane applied for a warm, durable finish.
Result: Rich reddish-brown grain was enhanced, and the satin sheen provided durability without looking overly glossy. Perfect for a family with kids and pets.
Case 3: Epsom Parquet Lounge – Precision Sanding for a Modern Look
Home type: 1980s townhouse
Timber: Parquet flooring (rimu and tawa mix), approx. 50 m²
Condition before sanding: Dull finish, several loose blocks, and scratches from years of use.
Work completed:
Loose parquet blocks reset and glued securely.
Diagonal sanding passes to account for multi-directional grain.
Light grey stain applied for a contemporary coastal look.
Sealed with three coats of water-based polyurethane in satin finish.
Result: Modernised appearance that matched the homeowner’s new décor, while maintaining the unique character of parquet flooring.
What These Cases Show Auckland Homeowners
Heritage villas require careful repair and gap filling alongside sanding.
Hard native timbers like matai respond well to oil-based finishes that bring out depth of colour.
Parquet and mixed-timber floors need specialist sanding approaches for best results.
These examples illustrate that while every Auckland floor is unique, professional sanding transforms tired surfaces into durable, attractive features that suit both traditional and modern homes.
Why Hire a Professional in Auckland
DIY sanding equipment is available for hire in Auckland, but there are big differences between what homeowners can achieve themselves and what trained professionals deliver.
Expertise with Local Timbers
Kauri, matai, rimu, and tawa each require different sanding pressures and finishing approaches. An experienced contractor knows how to avoid over-sanding soft kauri or managing resin-heavy matai.
Heritage villas in areas like Ponsonby, Mt Eden, and Devonport often need delicate handling to protect floors that are over 100 years old.
Advanced Equipment
Professional dust-free sanding machines are far more powerful and efficient than rental units.
Contractors use industrial-grade extractors, edgers, and buffers, ensuring consistent results across the entire floor, including corners and stairs.
Quality of Finishes
Professionals apply finishes in controlled conditions, reducing risks of streaks, bubbles, or uneven coats.
They can provide access to premium water-based or low-VOC finishes that aren’t always available in retail stores.
Long-Term Value
Poor DIY sanding can remove too much timber, reducing the lifespan of floors.
Professionals not only deliver a better immediate result but also extend the life of the timber, making the investment cost-effective over time.
Local Knowledge
Contractors working across Auckland understand how humidity, coastal air, and seasonal conditions affect curing.
They can recommend the best finish depending on whether a home is in a coastal suburb like Mission Bay or a damp valley area like Titirangi.
Bottom line: Professional floor sanding in Auckland ensures safer, cleaner, and longer-lasting results than DIY methods.
Conclusion: Bringing New Life to Auckland Timber Floors
Timber floors are one of Auckland’s greatest housing assets. From the golden warmth of kauri in Devonport villas to the rich tones of matai in 1960s bungalows, these floors connect modern homes to the city’s heritage. Over time, however, daily wear and Auckland’s humid climate take their toll.
This complete guide has shown how sanding and finishing restore timber floors, the unique characteristics of Auckland’s common timbers, the options for modern finishes, and the costs and timelines homeowners should expect. We’ve also looked at local case studies that prove what’s possible when skilled professionals carry out the work.
For homeowners, the message is clear: floor sanding is one of the most effective ways to refresh, protect, and add value to your home. Whether you’re preparing a property for sale, renovating a villa, or upgrading a family home, the right sanding and finishing approach will bring out the full potential of your timber floors.
At Floor Sanding Auckland Experts, we specialise in helping homeowners across Auckland achieve flawless, long-lasting results. From heritage villas in Ponsonby to modern builds in Albany, our team provides dust-free sanding, expert finishing, and reliable advice tailored to your home’s needs.
Ready to transform your floors?
Contact us today for a free in-home assessment and discover how professional sanding can bring new life to your timber floors.